CH.04 연산자들변수 범위와 더 다양한 변수형
4.1 지역 변수의 범위(Scope)와 지속기간(Duration)
#include <iostream>

//이름이 같은건 한 영역에 하나만 존재 가능. 만약 한 영역에서 사용하고 싶으면 namespace로 구분을 해줘야 됨.
//아래처럼 namespace안에 namespace를 계속 추가 할 수 있다. 하지만 굉장히 보기 안좋다.
//그래서 C++ 17에 추가된 기능이 있다. (컴파일러 버젼을 C++ 17로 변경해야 됨.)
//하지만 기능이 좋아졌다고 해도 너무 추가해서 쓰면 안좋다. 한 2개 정도까지가 적당.
    /*namespace work1
        {
        namespace work11
        {
            namespace work11
            {
                int a = 1;
                void doSomething()
                {
                    a += 3;
                }
            }
        }
    }*/
namespace work1::work11::work111
{
    int a = 1;
    void doSomething()
    {
        a += 3;
    }
}


namespace work2
{
    int a = 1;
    void doSomething()
    {
        a += 5;
    }
}


int main()
{
    using namespace std;
    // apple = 1; 여기서 apple변수 사용 못함.
    int apple = 5;

    cout << apple << endl;

    {
        apple = 1;
        cout << apple << endl;

        // 여기 범위에서 생긴 변수는 여기 범위 나가면 사라짐.
        // 밖의 범위의 변수와 같은 이름의 변수를 만든다면 밖의 범위의 변수는 가려져서 없는셈됨.
        // but 그래도 같은 이름의 변수는 사용하지 않는 것이 좋다.
        // 그런데 왜!! 다른 이름의 변수로 사용할거면 지역 지정을 안하면 되는데 왜 하느냐!
        // 현대적 프로그래밍에서는 변수의 범위를 최대한 줄일려고 하기 때문임.(객체지향 프로그래밍의 기초적인 철학임)
        int apple = 2;
        cout << apple << endl;
    }

    cout << apple << endl;

    work1::work11::work111::a;
    work1::work11::work111::doSomething();

    work2::a;
    work2::doSomething();

    return 0;
}

// apple = 3; 여기서 apple변수 사용 못함.
4.2 전역 변수, 정적 변수, 내부 연결, 외부 연결(Global Variable, Static Varible, Internal Linkage, External Linkage)
Chapter4_2.cpp
#include <iostream>
#include "MyConstanst.h"
using namespace std;

// Global Variable, Global Variable은 잘 안쓰는게 좋다.
// Global Variable 사용할땐 g_value 이런식으로 G.V라는걸 눈에 띄게 해주자.
// external linkage
int g_value = 123;

// 이 static Global Variable은 다른 cpp파일에서 접근 불가.
// internal linkage
static int s_g_value = 123;

// const int g_x; // X


void doSomething()
{
	// int a = 1; 이 변수 a는 초기화 될때 매번 새로운 메모리를 할당 받음.
	// 이 변수 a가 os로부터 받은 메모리가 static이란 뜻. static변수는 반드시 초기화 해줘야 됨. 디버깅할때 유용.
	// Static Variable
	static int a = 1;
	++a;
	cout << a << endl;
}

// Local Variable은 Linkage가 없다.

// forward declaration
// 어딘가에 몸체가 있을테니 일단 빌드를 하고 링킹할때 몸체를 갖다 붙이세요 라는 의미.
// extern void doSomething2(); 원랜 이거임 extern이 생략된 것.
void doSomething2();

// 몸체가 없으면 Chapter4_2.cpp 빌드할땐 오류 안뜨지만 링킹할때 오류뜸(Error code LNK는 링킹오류)
// test.cpp에서 b를 초기화한 상태로 여기서도 초기화를 하면 오류가 뜸.
// extern은 코드 전체가 공유하기 때문.
extern int b;

int main()
{

	cout << g_value << endl;

	int value = 1;

	cout << ::g_value << endl; // Global scope 이용하면 숨겨진 Global Variable 사용 가능.
	cout << value << endl;

	doSomething();
	doSomething();
	doSomething();
	doSomething();

	doSomething2();

	cout << b << endl;

	// Myconstants.cpp 없을땐
	// doSomething2()에서 찍힌 Constants::pi 주소와 바로 아래에서 찍힌 Constants::pi의 주소가 다르다..!
	// Myconstants.cpp 있을땐 같다..
	cout << "In main.cpp file " << Constants::pi << " " << &Constants::pi << endl;

	return 0;
}
Myconstants.cpp
namespace Constants
{
	extern const double pi(3.141592);
	extern const double gravity(9.8);
	//....
}
test.cpp
#include <iostream>
#include "MyConstanst.h"

// 초기화를 해줘야 메모리가 할당됨.
extern int b = 123;

void doSomething2()
{
	using namespace std;

	cout << "Hello " << endl;

	cout << "In test.cpp file " << Constants::pi << " " << &Constants::pi << endl;
}
MyConstanst.h
#pragma once

namespace Constants
{
	extern const double pi;
	extern const double gravity;
	//....
}
4.3 Using문과 모호성(Ambiguity)
#include <iostream>
using namespace std;

namespace a
{
    int my_var(10);
}

namespace b
{
    int my_var(20);
}

int main()
{
    // Compiler가 쭉 Complie을 하다가 cout을 만났을때 반응
    // 1. 어? 애는 뭐지?
    // 2. 어라 using namespace std;가 있네
    // 3. 그럼 std안을 한번 뒤져보자.
    // using std::cout; // cout만 가져오는 방식.
    cout << "Hello " << endl;

    //에러 방지를 위해서는 a::, b::식으로 지정 해줘야 한다.
    // 하지만 꼭 my_var식으로 사용하고 싶을 수가 있다.
    // 그럴때는 범위 지정을 해주면 된다.
    /*using namespace a;
    using namespace b;

    cout << my_var << endl;*/

    {
        using namespace a;
        cout << my_var << endl;
    }

    {
        using namespace b;
        cout << my_var << endl;
    }


    return 0;
}
4.4 Auto 키워드와 자료형 추론(Type Inference)
#include <iostream>

// 함수의 parameter type에는 auto 불가.
// template을 사용하면 대체 가능.
auto add(int x, int y) -> int
{
    return x + y;
}


int main()
{
    using namespace std;

    auto a = 123;       // int
    auto d = 123.0;     // double
    auto c = 1 + 2.0;   // double
    auto result = add(1, 2);

    return 0;
}
4.5 형변환 Type conversion
#include <iostream>
#include <typeinfo>
#include <iomanip>

int main()
{
    using namespace std;

    // Variable or Literal의 Data type을 알려줌.
    // 내가 선언한 변수인데 Data type을 모르겠어?
    //   ==> auto나 casting할때 유용하게 쓰임.
    int a = 123;
    cout << typeid(a).name() << endl;
    cout << typeid(4.0).name() << endl;


    // 명시적 형변환과 암시적 형변환
    // 암시적 형변환에는 2개가 있다.

    // numeric promotion
    // 작은걸 큰걸로 보낸다.
    float a1 = 1.0f;
    double d2 = a;

    // numeric conversion
    // 큰걸 작은걸로 보내거나, 타입을 바꿔서 넣어주는 경우.
    double d1 = 3;
    short s = 2;

    int i = 30000;
    char c = i;

    int i3 = 3;
    char c3 = i3;

    // c를 int로 변환. 127이라도 나오겠지 했는데 48이 나옴.
    cout << static_cast<int>(c) << endl;
    // 담을 수 있는 수라서 잘 나옴.
    cout << static_cast<int>(c3) << endl;


    double d = 0.123456789;
    float f = d;

    cout << std::setprecision(12) << f << endl; // 소숫점 12자리까지, float에 double을 정확히 저장하지 못했음.

    float f1 = 3.14;
    int i1 = f;

    cout << i1 << endl;

    // u는 unsigned라는 얘기.
    // 이상한 계산 값이 나옴. 형변환에도 Precedence가 존재.
    // 계산값인 -5를 unsigned에 저장할려고 한다. unsigned가 int보다 우선 순위가 높기 때문임.
    // int, unsigned int, long, unsigned long
    // long long, unsigned long long, float, double, long double
    // int가 우선순위가 가장 낮고 long double이 가장 높다.
    cout << 5u - 10;

    // C++ style
    // int i2 = int(4.0);

    // C style
    // int i2 = (int)4.0;

    // current style
    // 3개 스타일의 기능상 차이는 없는거 같다.
    int i2 = static_cast<int>(4.0);

    return 0;
}
4.6 문자열 std string 소개
#include <iostream>
#include <string>
#include <limits>
using namespace std;

int main()
{
    // char배열의 원소가 13개라고 뜬다. 마지막에 끝낸다라는 문자가 숨어져 있다.
    cout << "Hello, World" << endl;

    const char my_strs[] = "Hello, World";
    const string my_hello = "Hello, World";

    cout << my_hello << endl;


    // cin은 빈칸이 있으면 앞 내용만 변수에 담고 나머지는 버퍼에 담은 후 다음 cin 변수에 넣음.
    cout << "Your name ? : ";
    string name;
    // cin >> name;
    std::getline(std::cin, name);

    cout << "Your age ? : ";
    string age;
    // cin >> age;
    std::getline(std::cin, age);

    cout << name << " " << age << endl;


    // cin.ignore 없으면 age1에 넣은 값이 name1에 그대로 넘어감.
    cout << "Your age ? : ";
    int age1;
    cin >> age1;
    // std::getline(std::cin, age);

    // std::cin.ignore(32767, '\n');
    // 32767이란 숫자가 거슬리면 아래처럼 해도 됨.
    std::cin.ignore(std::numeric_limits<std::streamsize>::max(), '\n');

    cout << "Your name ? : ";
    string name1;
    // cin >> name;
    std::getline(std::cin, name1);

    cout << age1 << " " << name1 << endl;


    string a("Hello, ");
    string b("World ");
    string hw = a + b; // append 문자열 뒤에 다른 문자열을 더하는 것을 append라고 함.

    hw += "I'm good";

    cout << hw << endl;

    cout << hw.length() << endl;

    return 0;
}
4.7 열거형(Enumerated Types)
#include <iostream>
#include <typeinfo>
#include <string>
using namespace std;

// user-defined data types
// Enumerated type, 중괄호 뒤에 ; 꼭 찍어야 함.
// 서로 다른 enum일지라도 이름같은 변수 사용 못함.
// 차례대로 0, 1, 2, ...
// 원하는 숫자도 가능.
enum Color
{
	COLOR_BLACK = -3,
	COLOR_RED,
	COLOR_BLUE = 5,
	COLOR_GREEN = 5,
	COLOR_SKYBLUE,  // comma 쳐도 되고 안 쳐도 되는데 나중에 새로 추가할때 편함.
};

enum Feeling
{
	HAPPY,
	JOY,
	TIRED,
	BLUE,
};

// 프로그래머가 sword는 0번 hammer는 2번 이런식으로 외우는게 어렵다.
// 이걸 해결하고자 Enumerated type을 사용한다.
int computeDamage(int weapon_id)
{
	if (weapon_id == 0) // sword
	{
		return 1;
	}

	if (weapon_id == 1) // hammer
	{
		return 2;
	}

	// .....
}

int main()
{

	Color paint = COLOR_BLACK;
	Color house(COLOR_BLUE);
	Color appe{ COLOR_RED };

	Color my_color = COLOR_BLACK;

	cout << my_color << " " << COLOR_BLACK << endl;

	if (COLOR_BLUE == COLOR_GREEN)
	{
		cout << "Equal" << endl;
	}

	int color_id = COLOR_RED;

	cout << color_id << endl;

	// Color My_color2 = 3;
	// 3을 넣을 수는 없는데 캐스팅해서 넣을 수는 있다.
	Color My_color2 = static_cast<Color>(3);

	// cin >> My_color2; cin으로 직접 받을 수는 없다.
	// 직접 받을 수 없기에 우회해서 구현하는 방법이 있다.
	int in_number;
	cin >> in_number;

	if (in_number == 0) My_color2 = COLOR_BLACK;
	// ...


	//문자열을 받아서 넣어줄수는 있지만 권장하지는 않는다.
	string str_input;

	std::getline(cin, str_input);

	if (str_input == "COLOR_BLACK")
		My_color2 = static_cast<Color>(0);

	return 0;
}
4.8 영역 제한 열거형(열거형 클래스)
#include <iostream>
using namespace std;
int main()
{
// enum class는 enumerated type을 보완해줌.
enum class Color
{
RED,
BLUE,
};
enum class Fruit
{
BANANA,
APPLE,
};
Color color = Color::RED;
Fruit fruit = Fruit::BANANA;
// color와 fruit 비교 불가
/*if (color == fruit)
cout << "Color is fruit ? " << endl;*/
Color color1 = Color::RED;
Color color2 = Color::RED;
// color1, color2 비교 가능.
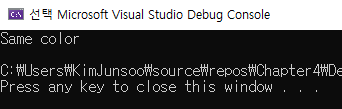
if (color1 == color2)
cout << "Same color " << endl;
return 0;
}
4.9 자료형에게 가명 붙여주기 (Type aliases)
#include <iostream>
#include <vector>
using namespace std;

int main()
{
	typedef double distance_t;

	// 컴파일러 입장에서 같음. 다만 프로그래밍의 편의를 위해서 typedef을 사용.
	// distance와 관련된 변수의 타입을 바꿀려면 typedef을 사용안했을 경우 일일이 다 바꿔 줘야 한다.
	// but typedef을 사용했다면 typedef double distance_t; 에서 한번만 바꿔줘도 됨.
	double		my_distance;
	distance_t	home2work;
	distance_t	home2school;


	// vector<pair<string, int> > pairlist;
	// 이런 타입은 일일이 타이핑하기 힘듬.
	// typedef 이용하면 아주 편함.
	// typedef vector<pair<string, int> > pairlist_t;
	using pairlist_t = vector<pair<string, int> >; // using namespace std; 의 using과는 다른 것임.

	pairlist_t pairlist1;
	pairlist_t pairlist2;

	return 0;
}
4.10 구조체(Struct)
#include <iostream>
#include <string>
using namespace std;
// Data와 Function들을 묶는다.
// struct 내부에서 초기화를 해줄 수 있다.
struct Person
{
double height = 3.0;
float weight = 200.0;
int age = 100;
string name = "Mr. Incredible";
void print()
{
cout << height << " " << weight << " " << age << " " << name; // .은 멤버 선택 연산자
cout << endl;
}
};
// struct안에 변수로 struct 사용.
struct Family
{
Person me;
Person mom;
};
Person getMe()
{
Person me{ 2.0, 100.0, 20, "Jack Jack" };
return me;
}
struct Employee // 2 + 4 + 8 = 14
{
short id; // 2 bytes
int age; // 4 bytes
double wage; // 8 bytes
};
int main()
{
// struct에서 변수들을 초기화 했을 경우에도 다시 struct 인스턴스를 생성할때 초기화 가능. 덮어씌어짐.
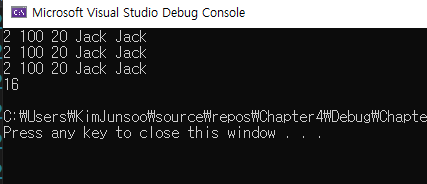
Person me{ 2.0, 100.0, 20, "Jack Jack" };
Person me2(me);
// printPerson(me);
me.print();
me2.print();
Person me_from_func = getMe();
me_from_func.print();
Employee emp1;
cout << sizeof(Employee) << endl; // 14 Bytes가 아닌 2가 더해진 16 Bytes가 할당됨. (Padding)
return 0;
}
'Computer language' 카테고리의 다른 글
| Programming: Principles and Practice Using C++ (0) | 2020.09.15 |
|---|---|
| [Ch.05] 홍정모의 따라하며 배우는 C++ < 흐름제어> (0) | 2020.09.09 |
| [Ch.03] 홍정모의 따라하며 배우는 C++ < 연산자들> (0) | 2020.09.06 |
| [Ch.02] 홍정모의 따라하며 배우는 C++ (0) | 2020.09.06 |
| [Ch.01] 홍정모의 따라하며 배우는 C++ (0) | 2020.09.05 |

