1. C++의 기초적인 사용법
1.3 변수와의 첫 만남
개념
- 객체 objects
- 변수 variables
- 초기화 initialization
- 대입 assignment
- 초기화를 안 했을 때의 문제점
#include <iostream>

int main()
{
	int x = 123; // initialization, x는 숫자를 담을 수 있는 공간을 메모리에서 차지하고 있고, 객체임.
	x = 123; // assignment, x라는 변수 이름이 가리키고 있는 메모리 공간에 123을 저장을 한다.
	// x는 Left-value, 123은 Right-value


	std::cout << x << std::endl;


	return 0;
}
1.4 입출력 스트림과의 첫 만남 cin, cout
개념
- cin
- cout
- endl
#include <iostream> // cout, cin, endl, ....
#include <cstdio> // printf

int main()
{
	// std::를 안써도 작동하게 해줌.
	using namespace std;

	int x = 1024;
	double pi = 3.141592;

	cout << "I love this lecture!\n"; //<< std::endl;
	// 3.14159까지만 출력됨 정밀도 조정된 것.
	cout << "x is " << x << " pi is " << pi << endl;

	// /t로 줄맞춤을 해줌.
	cout << "abc" << "\t" << "def" << endl;
	cout << "ab" << "\t" << "cdef" << endl;

	// 소리 출력
	cout << "\a";

	//printf("I love this lecture!\n");

	return 0;
}
#include <iostream> // cout, cin, endl, ....
#include <cstdio> // printf

int main()
{
	using namespace std;
	int x = 1;

	cout << "Before your input, x was " << x << endl;

	cin >> x;

	cout << "Your input is " << x << endl;

	return 0;
}
1.5 함수와의 첫 만남
개념
- 함수 function
- 리턴값 return values
- 매개변수 parameters
- 인수 arguments
#include <iostream>
using namespace std;

//함수 이름은 최대한 자세히 짓자.
//함수 생성과 동시에 변수 num_a, num_b가 생김과 동시에 인자값으로 초기화됨.
int multiplyTwoNumbers(int num_a, int num_b)
{
	int sum = num_a * num_b;

	return sum;
}

void printHelloWorld()
{
	cout << "Hello World " << endl;

	return;
}


int main()
{
	// 이런걸 엄청 많이 반복해야하고 귀찮은 과정이 많을때 귀찮으니 함수로 만들자.
	cout << 1 + 2 << endl;
	cout << 3 + 4 << endl;
	cout << 8 + 13 << endl;

	cout << multiplyTwoNumbers(1, 2) << endl;
	cout << multiplyTwoNumbers(3, 4) << endl;
	cout << multiplyTwoNumbers(8, 13) << endl;

	cout << "Hello World " << endl;
	printHelloWorld();


	return 0;
}
1.7 지역범위
#include <iostream>
using namespace std;

int main()
{
	int x = 0;
	//int x = 1; (X) 같은 범위 안에 같은 2개의 변수 선언 못함.
	cout << x << " " << &x << endl;
	//&x : 008FF8B0

	{
		cout << x << " " << &x << endl;
		//&x : 008FF8B0 위의 주소와 갖음. 이 local 영역에서 따로 x를 선언하지 않아서 그렇다.

		int x = 1; //위의 x와 아래의 x와는 다른 x임. 다른 메모리에 위치함.
		cout << x << " " << &x << endl;
		//&x : 008FF8A4
	}

	{
		int x = 2;
		cout << x << " " << &x << endl;
		//&x : 008FF898
	}

	cout << x << " " << &x << endl;
	//&x : 008FF8B0

	//local범위 안의 변수는 다른 local범위의 변수와는 다른 메모리 주소를 갖는다.

	return 0;
}
#include <iostream>
using namespace std;

void doSomething(int x)
{
	x = 123;
	cout << x << endl;
}

int main()
{
	int x = 0;

	cout << x << endl;
	doSomething(x);
	cout << x << endl;

	//0, 123, 0 출력됨.

	return 0;
}
1.8 연산자와의 첫 만남
개념
- 리터럴 Literal
- 피연산자 Operand
- 단항 unary
- 이항 binary
- 삼항 ternary
#include <iostream>
using namespace std;


int main()
{
	int x = 2; // x is a variable, 2 is literal.

	int y = (x > 0) ? 1 : 2; // Ternary operator. x>0이 참이면 1, 거짓이면 2.
	cout << y << endl;


	cout << 1 + 2 << endl; // 1 is literal, 2 is literal, 1+2 is experssion. + is operate. 1,2 is operand
	cout << "Hello, World" << endl;  // Hello, World is literal.

	return 0;
}
1.9 기본적인 서식 맞추기(Formatting)
#include <iostream>
using namespace std;

//들여쓰기는 필수이고, add1, add2 {} 형식을 많이 쓴다. 프로젝트를 여럿이서 할때면 둘 중 하나로 통일하자.
int add1(int x, int y)
{
	return x + y;
}
int add2(int x, int y){
	return x + y;
}


int main()
{
	// 줄바꿈을 할때 <<를 남겨두면 다른 개발자가 보고 아 줄바꿈이 일어났구나!를 알아챔.
	cout << "Hello, World" << "abcdef" <<
		"Hello Home" << endl;

	//변수 대입할때 tap키로 줄을 맞춰 줄수 있다.
	int my_v		= 1;
	int x			= 4;
	int num_apples	= 123;


	//주석이 짧으면 같은 줄에 주석을 달기도 하는데 길면 위에 달아주자. 그리고 주석,코드,주석,코드이면 중간에 한줄 띄어주자.
	//.............
	int x = 1 + 2;

	//............
	int y = 3 + 4;


	//cf. Hard코딩은 프로그래머가 코드에서 변수값을 리터럴 같이 고정된 값으로 직접 대입해주는 방식.
	// 반대로 Soft코딩은 프로그램 실행중에 사용자의 입력이나 외부 파일, 인터넷 통신 등으로 데이터를 가져 오는 방식.
	return 0;
}
1.10 선언(Declaration)과 정의(Definition)의 분리
#include <iostream>
using namespace std;

// forward declaration
int add(int a, int b);
int multiply(int a, int b);
int subtract(int a, int b);

int main()
{
	cout << add(1, 2) << endl;
	cout << multiply(1, 2) << endl;
	cout << subtract(1, 2) << endl;
	return 0;
}

//definition
int add(int a, int b)
{
	return a + b;
}

int multiply(int a, int b)
{
	return a * b;
}

int subtract(int a, int b)
{
	return a - b;
}
1.11 헤더(Header)파일 만들기
main_chapter.cpp
#include <iostream>
#include "add.h"

using namespace std;

int main()
{
	cout << add(1, 2) << endl;
	return 0;
}
add.h
int add(int a, int b);add.cpp
int add(int a, int b)
{
	return a + b;
}
cf. 파일들에서 add.cpp가 없는 상태에서 빌드를 하면 빌드가 된다. 하지만 링킹 에러가 발생함. main_chapter.cpp가 빌드될때 add.h파일을 통해 add가 Declaration 선언이 된걸 확인해서 빌드는 되지만 add의 몸통부분이 Definition되지 않았기 때문에 링킹에러가 발생.
1.12 헤더 가드(Header Guards)가 필요한 이유
add.h
//#pragma once

#ifndef MY_ADD
#define MY_ADD

int add(int a, int b)
{
    return a + b;
}

#endif
my_work.h
#pragma once

#include "add.h"

void doSomething()
{
    add(1, 2);
}
Chapter1_12.cpp
#include <iostream>
#include "my_work.h"
//#include "add.h"

using namespace std;

int main()
{
    doSomething();
}
add.h의 #ifndef ~ #endif를 전처리기라고 한다. 만약 Chapter1_12.cpp에서 add.h도 include하면 에러가 뜬다. 왜냐하면 my_work.h를 include하면서 add함수를 가져왔는데 add.h를 include 또 add함수를 가져오는 꼴이 되어 버리기 때문이다. 그래서 이것을 방지해 주는 기능이 전처리기다.
하지만 #ifndef ~ #endif는 입력하기 번거롭다. 그래서 이것과 똑같은 기능이 존재하는데 그게 바로 #pragma once이다.
아래의 코드는 Chapter1_12.cpp에 add.h를 include했을때의 상황이다.
#include <iostream>
//#include "my_work.h"
//#include "add.h"

int add(int a, int b)
{
    return a + b;
}

void doSomething()
{
    add(1, 2);
}

int add(int a, int b)
{
    return a + b;
}


using namespace std;

int main()
{
    doSomething();
}
보다시피 add가 2번 선언되는것을 볼 수 있다.
1.13 네임스페이스(명칭 공간, Namespace)
#include <iostream>

namespace MySpace1
{
	namespace InnerSpace
	{
		int my_function()
		{
			return 2;
		}
	}

	int doSomething(int a, int b)
	{
		return a + b;
	}
}


namespace MySpace2
{
	int doSomething(int a, int b)
	{
		return a * b;
	}
}

using namespace std;

int main()
{
	using namespace MySpace1;
	using namespace MySpace1::InnerSpace;

	doSomething(3, 4);

	MySpace1::InnerSpace::my_function();

	//cout << doSomething(3, 4) << endl;
	//cout << MySpace1::doSomething(3, 4) << endl;


	return 0;
}
Namespace
- 같은 이름을 사용하고 싶을 때 Namespace를 이용해 구분해 줄 수 있다.
- using namespace namespace의 이름; 선언을 통해서 간단하게 해당 namespace안의 함수들을 이용할 수 있다.
- using namespace의 선언이 없으면 namespace의 이름::함수를 통해서 직접 접근도 할 수 있다.
- namespace안에 또 namespace를 만들 수 있다.
1.14 전처리기와의 첫 만남
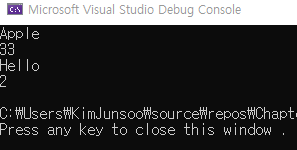
#include <iostream>
using namespace std;

//전처리기는 빌드 들어가기 전에 처리함.
//매크로, 거의 대문자로 사용, 매크로를 만나면 그냥 서로 바꿔버림, define의 효과는 같은 파일 안에서만 작용.
#define MY_NUMBER 33
#define MY_STRING "Hello"
#define MAX(a, b) (((a)>(b)) ? (a) : (b))

//해당 매크로는 아무런 내용이 없다. 즉 블랭크다. 하지만 전처리기 안에서는 블랭크로 바꾸지 않는다.
//예시는 메인안의 전처리기 참조.
#define LIKE_APPLE

int main()
{
#ifdef LIKE_APPLE
    cout << "Apple" << endl;
#endif

#ifndef LIKE_APPLE
    cout << "Orange" << endl;
#endif

    cout << MY_NUMBER << endl;
    cout << MY_STRING << endl;
    cout << MAX(1, 2) << endl;

    return 0;
}
'Computer language' 카테고리의 다른 글
| Programming: Principles and Practice Using C++ (0) | 2020.09.15 |
|---|---|
| [Ch.05] 홍정모의 따라하며 배우는 C++ < 흐름제어> (0) | 2020.09.09 |
| [Ch.04] 홍정모의 따라하며 배우는 C++ < 변수 범위와 더 다양한 변수형> (0) | 2020.09.08 |
| [Ch.03] 홍정모의 따라하며 배우는 C++ < 연산자들> (0) | 2020.09.06 |
| [Ch.02] 홍정모의 따라하며 배우는 C++ (0) | 2020.09.06 |


